Oracle Governance, Risk & Compliance
GRC-Application Access Controls Governor 8.6.5 Installation
Contents
Installation Contacts (Customer)Pre-Installation Checks
Installation Check-list
Server Information Worksheet
Data Sources (Datasource tns Information)
Software Staging Location
Critical Patch Information
Technical Validation
Edit .profile
Confirm ORACLE_HOME and TNSPING
Confirm SCHEMA and GRANTS
Confirm language
Confirm os settings
Confirm db parameters
Create directories and set permissions
Confirm Environment Variable (JAVA,Middleware)
Installing Pre- Requsites
Install Weblogic 12.0.2
Install ADR 12.1.2 (Application Development Run Time)
Install RCU
Install GRC
GRC Domain Creation
Modify setDomainEnv.sh
Modifying Java Settings
AACG Application Deployment
Post Installation Activities
Application Configuration
Security Configuration
Notification Configuration (prevent option)
Operational Procedures & Recommendations
Application Access
Startup & Shutdown
GRC Application Environment Validation Scripts(EVS) [ID 1286446.1]
GRC_Database_Info.sh
Linux_GRC_Application_Debug.sh
References
Installation Check-list
- Provision Server operating System
- Provision Server database
- Complete Server Information worksheet
- Create or confirm software staging location and create all directories
- Download all software and patches
- Run md5sum to verify each download
- Setup environment and perform technical validation
- Provision JDK
- Provision Weblogic
- Confirm Application reachable (tomcat or weblogic page)
- Application Installation/ Patching
- Datasource Setup / Sync
- Install Summary Updates

Edit environment file .bash_profile (Technical Valdation)
##Added per GRC Installation
export JAVA_HOME=/apps/grc/jdk1.7.0_11
export PATH=$JAVA_HOME/bin:$PATH
export MW_HOME=/apps/grc/Middleware

Specification
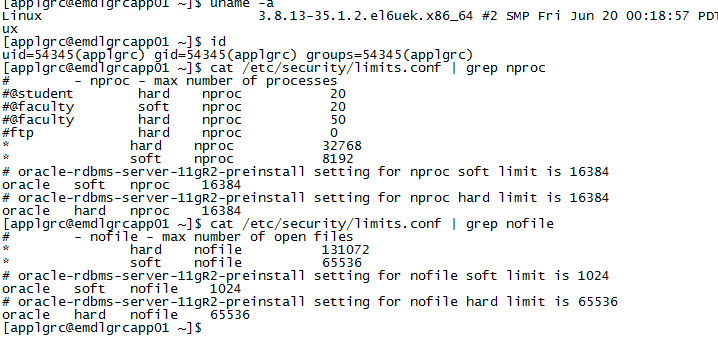
Step 1 – Confirm OS settings
GRC runs on a 64-bit Linux server. Be sure the following lines exist in the /etc/security/limits.conf file:
Please set this value.
* Soft nproc 8192
* Hard nproc 32768
* Soft nofile 65536
* Hard nofile 131072
Step 2 – Creating GRC and DA Schemas (Installation guide Page 1-3)
Create user LF_GRC identified by Leapfrog2014% default tablespace GRCC quota unlimited on GRCC quota 0k on system;
grant connect, resource to GRCUSER;
grant create any view to GRCUSER;
grant create any table to GRCUSER;
grant drop any table to GRCUSER;
grant create synonym to GRCUSER;

Step 3 – Creating GRC Repositories (Installation Guide 2-3)
Create the following repositories in a directory/mount point that is large. This will be home to logs and large reports.
mkdir –m 777 tcg_etl grc_rpt bk_logs

Step 4 – Oracle Database settings (Installation Guide 1-4)
ALTER SYSTEM SET open_cursors=5000 scope=spfile;
ALTER SYSTEM SET processes=3000 scope=spfile;
ALTER SYSTEM SET deferred_segment_creation=FALSE scope=spfile;
SELECT name, VALUE FROM v$parameter
WHERE name IN (‘open_cursors’, ‘processes’, ‘sessions’, ‘deferred_segment_creation’);

Install Java
Installing java in /apps/grc
pwd
/apps/grc
tar xvzf jdk-7u11-linux-x64.tar.gz
export JAVA_HOME=/apps/grc/jdk1.7.0_11;
export PATH=$JAVA_HOME/bin:$PATH;
which java
java -version


Step 5.1 – Edit environment file .bash_profile
export JAVA_HOME=/apps/grc/jdk1.7.0_11
export PATH=$JAVA_HOME/bin:$PATH
export MW_HOME=/apps/grc/Middleware
Step 5.2 – Confirm Environment (Java, Oracle, Path
ALTER SYSTEM SET open_cursors=5000 scope=spfile;
ALTER SYSTEM SET processes=3000 scope=spfile;
ALTER SYSTEM SET deferred_segment_creation=FALSE scope=spfile;
SELECT name, VALUE FROM v$parameter WHERE name IN (‘open_cursors’, ‘processes’, ‘sessions’, ‘deferred_segment_creation’);

Step 6.1 – Confirming Data_Pump_Directory
CREATE SMALLFILE TABLESPACE “LF_GRCBACKUP”DATAFILE ‘/u01/app/oracle/data_pump_dir’ SIZE 2G AUTOEXTEND ON NEXT 20M MAXSIZE UNLIMITED LOGGING EXTENT MANAGEMENT LOCAL SEGMENT SPACE MANAGEMENT AUTO;
Step 6.2 – Create GRC_BACKUP Folder
- CREATE USER LF_GRCBACKUP IDENTIFIED BY integra2014 DEFAULT TABLESPACE LF_GRCBACKUP_TBS QUOTA UNLIMITED ON GRCBACKUP_TBS;
- GRANT READ,WRITE ON DIRECTORY DATA_PUMP_DIR TO LF_GRCBACKUP;
- GRANT EXP_FULL_DATABASE,IMP_FULL_DATABASE TO LF_GRCBACKUP;
- GRANT CREATE SESSION TO LF_GRCBACKUP;
- GRANT CREATE TABLE TO LF_GRCBACKUP;
- GRANT UNLIMITED TABLESPACE TO LF_GRCBACKUP;
- GRANT EXECUTE ON UTL_FILE TO LF_GRCBACKUP;
Step 7.1
Start the Oracle Fusion Middleware 12c Weblogic Installer
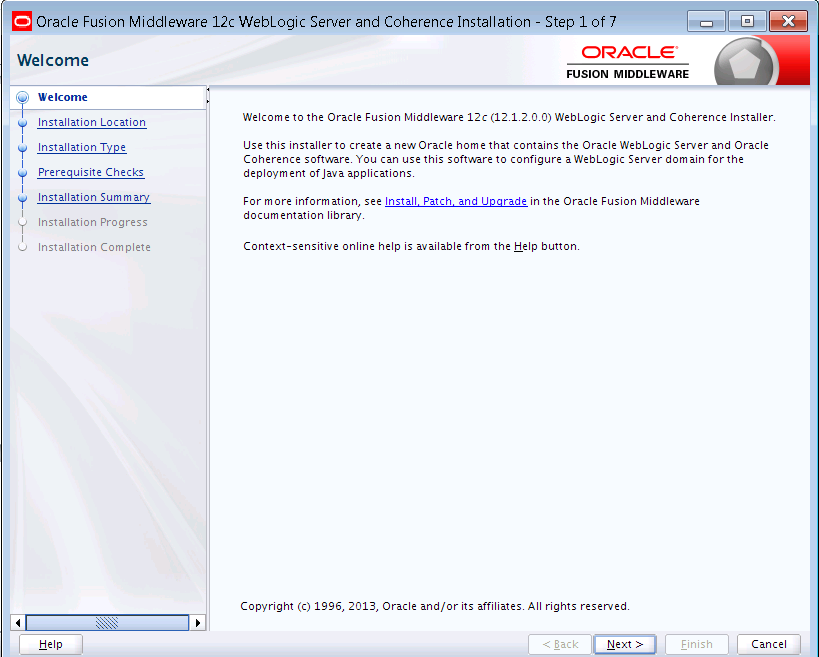
Step 7.2
Click Next.
Step 7.3
Enter Oracle Home Directory location.
/oracle/Middleware
Click Next.

Step 7.4
Click Weblogic Server Installation and Click Next to proceed.

Step 7.5
Now installer checks for Prerequisite Checks. Once it has been completed, you can view log by clicking View Log or Click Next to proceed.

Step 7.6
Once all the process has been completed the setup finally enters to installation panel in this you can view “Installation Location”, “Disk Space” and “Feature Sets to Install”. You can also save the response file. Click Install to Proceed.

Step 7.7
Installation Process will be completed once all the operation has been completed.

Step 7.8
Once the installation has been completed you will see the message at bottom like “Oralce WebLogic installation completed successfully”. Click Finish.

Step 8 – Install ADR (Advanced Runtime)
Step 8.1
Execute the fusion middleware jar file using the below command.
java -jar fmw_infra_12100.jar

Step 8.2
Installer process will be started.

Step 8.3
Installation wizard will continue. Click Next to Proceed.

Step 8.4
Enter Oracle Home Directory location.
/oracle/Middleware
Click Next.

Step 8.5
Select “Fusion Middleware Infrastructure” and “Fusion Middleware Infrastructure with Examples” according to your requirements

Step 8.6
Installation Summary will be displayed to ensure the requirements. Click Install to continue.

Step 8.7
Installation progress will proceed

Step 8.8
Installation progress will be completed. Click Finish to complete.

Step 9 – Install RCU
Step 9.1
Navigate to
/oracle/Middleware/oracle_common/bin

Step 9.2
Repository Creation Utility wizard will be initiated.

Step 9.3
Select Create Repository and select the appropriate operation that need to be performed.
Three operations can be performed as below
- System Load and Product Load
- Prepare Scripts for System Load
- Perform Product Load
Click Next.

Step 9.4
Enter the Database Connection details like Database Type , Hostname, Port number, Service Name, Username, Password and Role. Click Next to proceed.

Step 9.5
Select components and services you need to install. You can use the existing Prefix or Create a new Prefix by selecting the required option
Click Next.

Step 9.6
Enter the Schema password and even you can create same password for all schemas by clicking the options below.

Step 9.7
Review the summary whether all the details have been entered correctly.
Click Create to start the repository creation process.

Step 9.8
You can view the complete summary of the Database Details, Components installed, Status, Time and Log fine crated for each component. Click Close the finish the process.

Step 10 – Creating Weblogic Domain
Step 10.1
Execute the config script using the below command.
./config.sh

Step 10.2
Fusion Middleware Configuration wizard opens to create a new weblogic domain

Step 10.3
Setup will continue each one by one process. The first process is to create a Domain using preloaded product templates or using custom template. Click Next to proceed.

Step 10.4
Select the application location and the process will be moved to next step in that you can create an Administrator Account Credentials like Username and Password.
Click Next.

Step 10.5
Select the domain mode which suites best according to the requirements
You can select Development or Production. Select the Oracle Hotspot preloaded location or select other JDK Location.

Step 10.6
Select the database configuration type .In two ways it can be performed
- By using RCU Data
- Manual Configuration
Click Next to proceed.

Step 10.7
You can choose the appropriate settings from the loaded one for the JDBC Component Schema. Click Next.
10.8
JDBC component schema test will run a set of operation to verify the components installed. This process can be done by click Test Selected Connections. Click Next to continue.

10.9
In the Advanced Configuration option you can manage Administration Server, Node Manager, Managed Servers, Clusters and Coherence.
Click Next

10.10
The next process will move according to option selected in the Advanced Configuration. For example I have choosed “Administration Server”. So I have to enter the settings for that module.
Once all the details have been entered like server name, Listen Address, Listen Port and Etc.
Click Next to Proceed.

10.11
The setup now moves to Configuration Summary block in this you can view which all the modules you have created in the above steps will be mentioned. You can also view the class under each subdivision and location where it’s going be installed.
Click Create.

10.12
When the configuration process is completed it will show the Configuration success windows with the message “Oracle Weblogic Server Configuration Succeeded” and “New Domain base_domain creation Successful”.
Click Finish to complete the process.

STEP 11- Modify Java Settings:
1). Create a folder called like GRC_865 under $MW_HOME.
2). From 865_stage/dist folder copy grc.ear file to $MW_HOME/GRC_865
3). Extract (unzip) grc.ear (ex: unzip grc.ear)
4). Go to $MW_HOME/user_projects/domains/grcdomain/bin/Vi setDomainEnv.sh
Search for USER_MEM and add the following tags.
5). In SetDomainEnv.sh file itself
Locate the extra_java_properties section of the file. In it, remove the following string:
‑Dorg.apache.commons.logging.Log=org.apache.commons.logging.impl.Jdk14Logger
6).search for # ADD EXTENSIONS TO CLASSPATHS tag
if [ “${PRE_CLASSPATH}” != “” ] ; then
CLASSPATH=”${PRE_CLASSPATH}${CLASSPATHSEP}${CLASSPATH}”
export CLASSPATH
fi
Add the following before those lines:
# ADD EXTENSIONS TO CLASSPATHS
PRE_CLASSPATH=”/u01/GRC865_MW/grc_865/grc/WEB-INF/lib/jython-2.5.1.jar:${PRE_CLASSPATH}”
export PRE_CLASSPATH
Note: /u01/app/wls12c/user_projects/domains/<grc_domain>/servers/ AdminServer/stage/grc865/grc865/grc is where you have WLS host the source. If you “copy to all targets”, then the source is under “stage.”
12 – GRC 865 Deployment
Step-12.1
1). Start Adminserver
2). Go to weblogic console ( URL: http://hostname:port/console login with weblogic uid).
3). Enter the Credentials and Click Login.

Step-12.2
Click Lock & Edit in Change Centre and Click Deployment under “Domain Structure”.
Click Install and Select the GRC_865 location and click Next.

Step – 12.3
Select “Install this deployment as an application” in the “Install Application Assistant” panel and Click Next.

Step-12.4
Enter the Deployment name and select “DD Only: Use only roles and policies that are defined in the deployment descriptors. Scroll down to see more options to enter.

Step – 12.5
Manually select “I will make the deployment accessible from the following location” and enter the location.
Select “Use the same accessibility as the application” and Click Next.

Step-12.6
Under the Additional Configuration, select Yes, take me to the deployment’s configuration screen and Click Finish.

Step-12.7
Click “Deployment” and select “GRC_865” to start the application. The state will be “Prepared”.

Step-12.8
“Start Application Assistant” will be prompted and will show the application which needs to be started.
Click Yes and Proceed.

Step-12.9
Now you can see the state has been changed to “Active”.

Step-12.10
Select “GRC_865” under deployments. You can view the detailed configuration and other things in that window.

Step-12.11
Login to GRC application and Click Navigator and select “Setup and Administration”.

Step 13 – Post-Installation Configuration
Step 13.1
Under “Setup and Administration” tasks click “Manage Application Configurations”

Step 13.2
Now verify that the installation configuration was configured properly.

Step 13.3
Use the details below for the Application Configuration process.
| User | T_GRC |
| Password | |
| Port | |
| Service Identifier | DEV_GRC |
| Server Name | |
| Report Repository Path | /d02/grc_rpt |
| Log Threshold | DEBUG |
| Transaction ETL Path | /d02/tcg_etl |
| App Server Library Path | /Oracle/Middleware/user_projects/domains/base_domain/lib/ |
| Optimize Distributed Operation | Enabled |
| Optimize Appliance-Based Operation | No |
| ORACLE_HOME Path | No |
| Enable ERA ETL Optimization | No |
| Maximum Login Attempts | 6 |
| Elapsed days before password expiration | 90 |
| # of Cores Available (min 2) | 2 |
| Maximum MB or Ram for processing(Total Ram – 8GB) | 326768 |
Step 14-Operational Procedures and Recommendations
Login to the Application. Under “Setup and Administration” tasks click “Manage Application Configurations”.
Click “Notification” Tab.
You can also configure “Notification Schedule” and “Notification Content” according to the client requirements.

Click “Security” Tab
Enter the following details like “Maximum Login Attempts”, “Elapsed Days Before Password Expires” and “Use Basic Authentication for Web Service”.

Step – 14
Step -14.1 – Operational Procedures and Recommendations
| Application Server | Login to the Server | http://hostname:port/grc |
| Login as | As applgrc | |
| Navigate to | /oracle/Middleware/user_projects/domains/base_domain/bin | |
| Start WebLogic | nohup ./startWebLogic.sh & | |
| Stop WebLogic | stopweblogic | |
| Log file (grc.log) | located at/oracle/Middleware/GRC_865/grc/log/grc.log | tail -f grc.log |
| Log Rotation | start_aacgstop_aacgPrior to startup it is recommended to delete the log file. The file will be regenerated upon startup. |
The amount of detail is controlled via the application configuration and should be set to show ERRORs in normal running capacity to keep the logs smaller./oracle/Middleware/user_projects/domains/base_domain/bin/start_aacgView Image1 for more details.
Image1


Open GRC Application and Click
 to view the Application Name and Version of the GRC installed.
You can also view the current patch installed.
